Homemade, Healthy, Happy

Homemade delights with Healthy ingredients, for a Happy you

  • Facebook
  • Instagram
  • RSS
Navigation
  • Our Farm
  • Our Pork
  • Visit Our Farm
  • Blog
  • Recipes
  • Workshops&Classes
  • Contact

Marshmallows – Naturally Sweetened and Grain Free!

July 19, 2012 by Sarah 13 Comments

Tyler’s preschool had another fire today. Don’t panic – not an accidental fire! A planned fire, in a proper fire pit. They did one earlier in the year, and Tyler loved it. He happily toasted some pieces of fruit on the end of a stick while his peers roasted their marshmallows. He’s pretty good at knowing what things will make him feel terrible if he eats them and making good decisions accordingly, but he did express a sense of being left out sometime afterwards. I don’t think he actually cared about the marshmallows, more so that everyone else was roasting them except him. So this time around, I decided we would try our luck at making marshmallows so he could join in the fun completely.
Homemade marshmallows are a huge improvement on the store bought ones just for the fact that you know what is in them! But why make something at home with white, processed sugar when you could do it with something more natural? Which begs the question why consume processed and nutritionally-void white sugar at all when you can consume something more natural, but that is not our topic today! We are here to discuss marshmallows!

Now. I hate marshmallows. The store bought ones make me ill (suprise!) and I’ve never had a real marshmallow before. Therefore, my marshmallow judgement is based squarely on a very skewed experience of the humble marshmallow. These little guys are nothing like your store bought marshmallow. These are floaty, pillowy squares of amazingness. They are not oddly crunchy on the outside. And because they contain rapadura, they have a beautiful, natural caramel flavour. Yum.

Let me just also confess: I was SO far out of my comfort zone doing this. The only kind of ‘candy’ I had ever made were those hard toffees that we used to make and sell at cake stalls etc in primary school. My last toffee-making experience (it would have to have been around 12 or 13 yrs of age – Bec, feel free to correct me on this!) was a disaster. My friend and I overflowed the boiling toffee mixture onto her mother’s stove. And not an easy to clean stove, either! One of those electric stoves with the wire coils, and the boiling syrup went all the way down under the coils… Needless to say, we were banned from making toffees until we were ‘over’ the whole toffee-making thing anyway. So if I can do these marshmallows, you surely can! They are ridiculously easy.

The verdict on them from the adults was: texture great, taste awesome! The preschool kids loved them, even though they tended to melt more quickly than the store-bought variety. The kids really enjoyed them ‘gooey’! They all disappeared quickly, so I’m taking that as a sign of success!
Now, I’m not advocating that you make marshmallows all the time. They don’t even really fit in at all with our current eating ethos – too much sugar and just not enough nutrient value. That being said, kids do need to be kids. It’s fair game for us as parents to offer our kids better alternatives rather than having them miss out. In a balanced, nutritionally power-packed, bioavailable (i.e. easily digested) diet, the occasional ‘healthy’ marshmallow is fine!

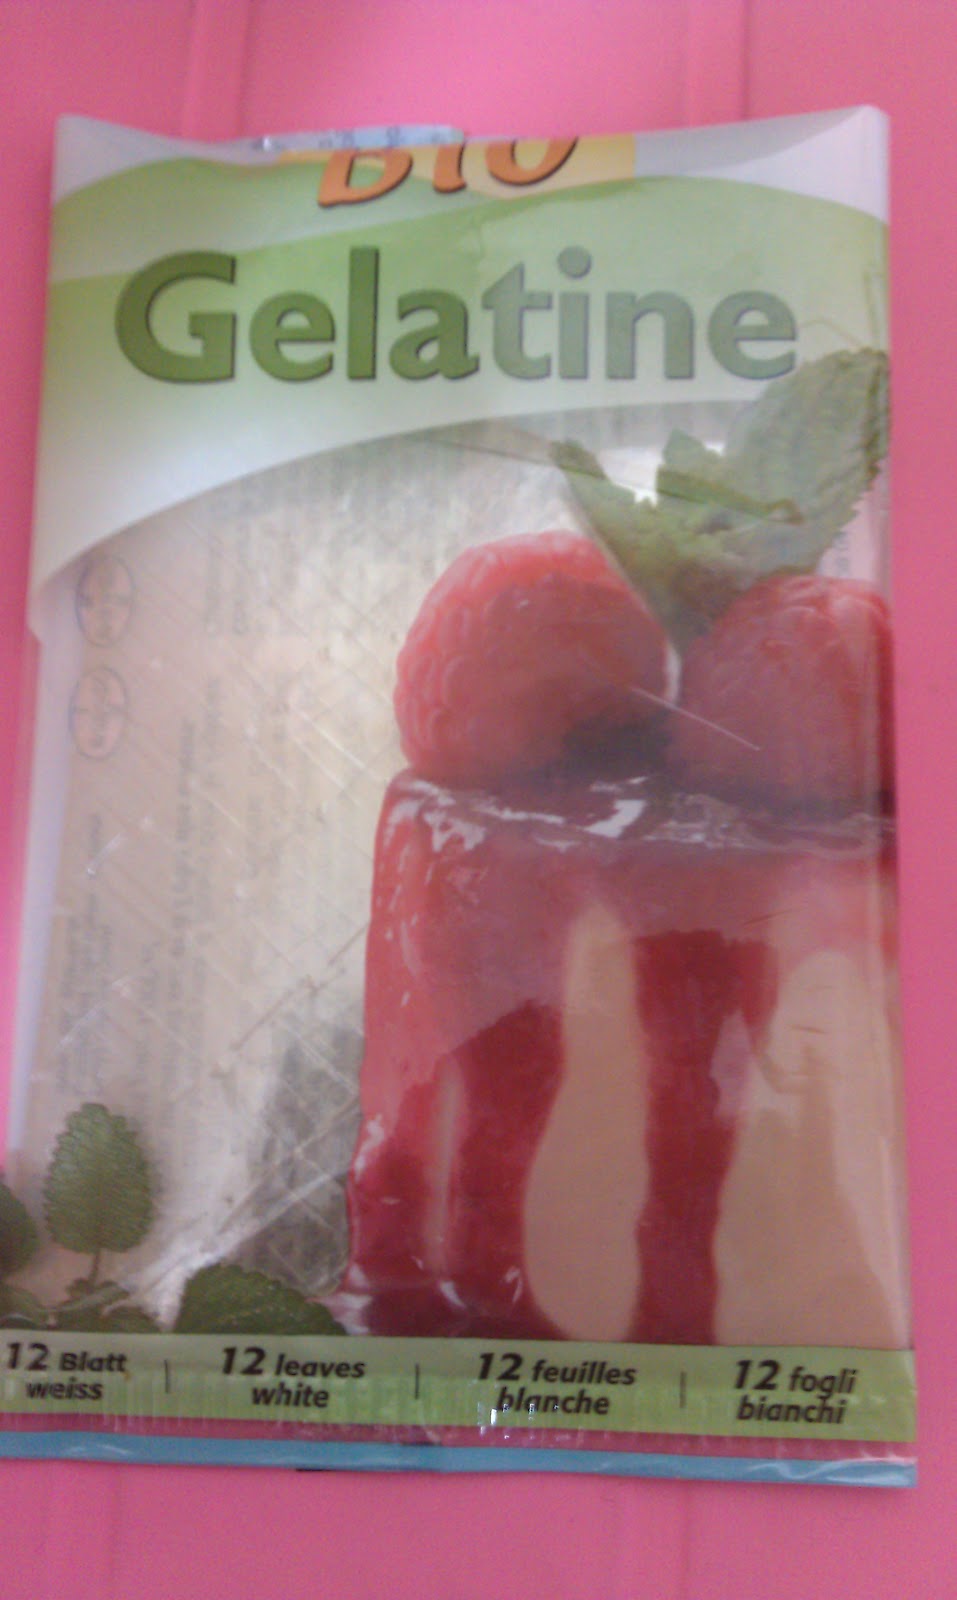
And one more thing, before I launch into the recipe… As usual, this recipe is made using my Thermomix. However, a few of my followers over on my HHH facebook page don’t own a Thermomix and requested a stovetop version too. I’ve put together a stovetop method based on an old recipe I was working from plus my tweaks (rapadura instead of white sugar, honey instead of HFCS, and gelatine leaves instead of powdered gelatine). Both the Thermomix method and the stovetop method are included below. Give it a whirl and report back! 🙂

My marshmallow-monster, enjoying the fire!
‘Healthy’ Marshmallows
Ingredients:
6 titanium strength gelatine leaves (preferably organic)
300g boiling water – I got it straight from the kettle
extra cold water, to soak gelatine leaves
1 vanilla bean
230g rapadura sugar
150g good quality honey
1/4 tsp sea salt
50g rapadura sugar, for dusting (or ground rapadura, if you don’t have a Thermomix; if you can’t find ground rapadura, icing sugar will have to do)
50g coconut flour, for dusting
Thermomix Method:
1) Weigh rapadura sugar (230g), honey and boiling water into TM bowl. Add the seeds scraped out of the vanilla bean, plus the salt. Cook for 20 minutes on Varoma, speed 3.
2) Meanwhile, put gelatine leaves in a bowl and cover with cold water. Leave for 5 mins to soak, then squeeze excess moisture out of the gelatine leaves and set aside in a dry bowl.
3) Once the syrup finishes cooking, add the squeezed-out gelatine leaves to the TM bowl and mix in for 20 seconds on speed 6.
4) Let mix cool to 37 degrees. This may take a couple of hours or so – if you have a second bowl set, awesome! If not, just pour the syrup into a big bowl after you have mixed in the gelatine, and leave it for a couple of hours or until it reaches 37 degrees, then back into the TM bowl for whipping.
5) Once mix cools to 37 degrees, insert butterfly and beat for 8-10mins on speed 4.
6) Meanwhile, oil a 20cm square cake tin and a loaf tin, or one big rectangular dish.
7) Pour the whipped sugar syrup into your prepared cake tins and set in the fridge (approx. 4 hours).
Stovetop Method:
1) Put rapadura sugar, honey, water, salt and the seeds from the vanilla bean into a saucepan. Cover and bring to a vigorous boil. Then the recipe that I am referring to says to uncover the saucepan and cook without stirring until it reaches the soft-ball stage (234-240 degrees Fahrenheit). From what I have read though, this means to boil it vigorously for a full minute.
2) Meanwhile, put gelatine leaves in a bowl and cover with cold water. Leave for 5 mins to soak, then squeeze excess moisture out of the gelatine leaves and set aside in a dry bowl. Oil a 20cm square cake tin plus a loaf tin, or one big rectangular tin.
3) Pour your boiled syrup into the bowl of a stand mixer, or just a regular mixing bowl if you don’t have a stand mixer (you will need at least a hand mixer, though). Add the squeezed-out gelatine leaves and mix on medium speed for 20 seconds. Let the mixture cool to a lukewarm temperature (will take a couple of hours). Then get your mixer going on medium speed again and beat for 8-10 minutes.
4) Pour your silky marshmallow mix into the tins and pop them in the fridge for 4 hours to set.
To cut marshmallows:
1) Prepare the dusting mixture: weigh extra 50g rapadura sugar into TM bowl. Mill on speed 9 for 1 minute. Add coconut flour. Mix on speed 7 for 25 seconds. Set aside in a bowl. Without a Thermomix: whisk ground rapadura or icing sugar with the coconut flour in a bowl.
2) If you have a thermomat, get it out and dust it with the rapadura-coconut dusting mix. If not, dust the bench with the dusting mix.
3) Get your marshmallow tins out of the fridge and dust the tops of both with the dusting mixture. Working with one tin at a time, turn the tin upside down and ease out the marshmallow slab. Dust all sides and the base thoroughly. Cut a ribbon approx 2.5cm wide from the marshmallow slab using kitchen shears/scissors, dusting all sides of the ribbon once cut (see image below). Still using your kitchen scissors, make cuts every 2.5cm along this ribbon to make squares of marshmallow, coating all sides as you cut. Repeat with the rest of the marshmallow slab, then repeat again with the marshmallow slab from the other tin (if using two tins).
Note: Your syrup will change slowly while you beat it, from a thin dark brown syrup to a very pale, silky, glossy mix that is much larger in volume. Don’t panic, this is exactly what you want to happen!
The cutting of the first marshmallow ‘ribbon’ from the marshmallow slab.
 This is the brand of organic gelatine leaves I used – Bio Gelatine. They are titanium-strength!
The reason I chose gelatine leaves over powdered gelatine is that all of the powdered gelatines I could find had Preservative 220 in them – that’s the one that we react to the worst and let’s face it, none of us really need an extra dose of preservatives when it can be done using preservative-free gelatine leaves!

Have fun, and eat responsibly! 😉

Filed Under: Recipes, Sweet Treats Tagged With: grain free, naturally sweetened, sweets

« Gluten-Free Cheesy Rolls
CADA Breakfast Crumble »

Comments

  1. Kacey Wells says

    July 24, 2012 at 8:16 pm

    How long do you put gelatine in water for? We put it in for the 5mins and returned to it completely dissolved… this is the first time I’ve ever worked with gelatine leaves but we used our last 6 leaves (they cost a whopping $13 for 12 of them) and we put them in the warm water one at a time for about 15 seconds and they are soft… did anyone else have this issue or are we the only ones?
    Thanks.

    Reply
  2. Sarah says

    July 24, 2012 at 9:30 pm

    Kacey, I have to apologise HUGELY for a very silly little mistake that I made in my original post. It should have read cold water, not warm water. I don’t know how I managed to mix that up and I’m very sorry you lost your gelatine. I’ve edited the blog post now, and I do hope you will try this recipe again, it is absolutely worth it.
    More apologies, a thousand times over.

    Reply
  3. Kacey Wells says

    July 25, 2012 at 8:02 pm

    Thanks Sarah, lucky we had a pack of 12 gelatine leaves, so we did it again and just dipped them in for 15 seconds and squeezed them out. The marshmallows are so good. So much better than supermarket ones 🙂

    Reply
    • Sarah says

      July 26, 2012 at 10:16 pm

      Oh, Kacey, I am SO glad to hear you managed to make it work!!! Phew! And I’m super glad you enjoyed them, too. They are pretty more-ish! 🙂

      Reply
  4. Utterly Organised says

    July 27, 2012 at 10:01 pm

    Hi Sarah,

    Where do you buy gelatine leaves from? I notice that quite a few of the TMX recipes call for them too and I have no idea where to purchase.

    Allison @ Utterly Organised

    Reply
  5. Sarah says

    July 31, 2012 at 8:38 pm

    Hi Allison! I bought them from my local Health food store – Healthy Life. They are a chain, and have a few shops around, but I daresay most health food shops would stock them. Harris Farm or Village Grocer or those types of big grocers may have them too. I used the titanium strength gelatine leaves – if you can’t find one quite so strong, you may want to try using a couple more leaves or less water and see how it goes. Hope that helps! 🙂

    Reply
  6. Kristy East says

    August 27, 2013 at 4:42 pm

    Just made my 1st batch. they are amazing! Thanks for the recipe.

    Reply
    • Sarah says

      November 24, 2013 at 8:13 pm

      SO glad you loved them, Kristy! 🙂

      Reply
  7. Nay Roskell says

    September 26, 2013 at 1:25 pm

    The rapadura sugar gives it an amazing caramel flavour, and I hope you won’t take offense, but I will be making this recipe using agar agar in future as I only recently became aware of what gelatine is made from, silly me!!!

    Reply
    • Sarah says

      November 24, 2013 at 8:22 pm

      Yes, I love the caramel taste that the rapadura adds! 🙂
      Don’t totally cross gelatin off as an option – there are some amazing grass-fed sources of gelatin that are much more ethical than the average supermarket variety. And gelatin has so many health benefits that are rarely talked about… This post here might be a good starting point for you: http://www.savorylotus.com/2013/05/22/gelatin-do-you-know-this-superfood/
      Thanks for commenting! xoxo

      Reply
  8. Denise says

    May 7, 2015 at 4:31 am

    I’m glad I found this recipe. I’d like to make marshmallows in my TM
    It’s something I keep saying I will make but haven’t done it yet.
    I’d like to use my gelatin, it’s not sheets, rather the powdered variety that I measure out.
    Any chance you have an equivalent amount to use for this recipe?
    Thank you!

    Reply
    • Sarah says

      July 27, 2015 at 3:30 pm

      I actually have done it with powdered gelatin since! I used 1/2 tablespoon powdered gelatin per leaf in the recipe, since they were titanium strength gelatin leaves that I used originally. 🙂

      Reply

Trackbacks

  1. I Think You're Ready for this Jelly - Homemade, Healthy, Happy says:
    March 12, 2014 at 11:48 am

    […] Cups, from Health Starts in the Kitchen Peppermint Mocha Pots de Crème, by Happy Healthnut And Homemade Marshmallows, by […]

    Reply

Leave a Reply to Nay Roskell Cancel reply

Your email address will not be published. Required fields are marked *

Search this blog

Sarah is a Real Food enthusiast who just keeps it real. She raises organic pasture-raised pork, with an emphasis on animal ethics and regenerative agriculture. She shares real food recipes and natural lifestyle tips, with a bit of humour and rambling on and the occasional rant about the food system. She loves to farm, cook, eat and write - so she does! Read more about Homemade, Healthy, Happy…

Recent Posts

Pastured pork

Food Security – A Cautionary Tale

Natural Second Trimester Survival Kit on Homemade, Healthy, Happy

Natural Second Trimester Survival Kit

The Natural First Trimester Survival Kit on Homemade, Healthy, Happy

Natural First Trimester Survival Kit

fathers day gifts

Archives

About Sarah

Sarah is a Real Food enthusiast who just keeps it real. She raises organic pasture-raised pork, with an emphasis on animal ethics and regenerative agriculture. She shares real food recipes and natural lifestyle tips, with a bit of humour and rambling on and the occasional rant about the food system. She loves to farm, cook, eat and write - so she does! Read More…

Popular Posts

No Poo – How I Wash My Curly Hair Naturally

Keeping it Real Ebook Giveaway on Homemade, Healthy, Happy

Peppermint White Hot Chocolate and ALL THE THINGS!

Easy Vanilla Caramel Ice Cream… and a Giveaway!

Peach & Mango Frappe and a Giveaway!

Coconut Slice, The Perfect Lunchbox Treat on Homemade, Healthy, Happy

Coconut Slice, The Perfect Lunchbox Treat

REAL Fish Sauce – A Recipe and a Giveaway

Legal mumbo-jumbo: Posts on this site may contain affiliate links. If you make a purchase through one of these links, Sarah may receive a small bonus so she can (sort of, almost, not really) justify the hours and hours that she pours into this blog. Sarah is committed to never selling out - she only promotes products that she truly loves and believes in. Any details entered into the email sign up box above are never sold or shared or spammed or anything else - just used to distribute the awesome Homemade, Healthy, Happy newsletter. If you haven't signed up yet - what are you waiting for?!

Copyright © 2025 · Foodie Theme by Shay Bocks · Built on the Genesis Framework · Powered by WordPress